
There are various things that can be made into a telltale game with different themes and different stories. I would like to make a game based off of either the war genre or something inspired by Hp Lovecraft. If i was to make an interactive tell tale game about the war genre I would probably create one about D-day and the hell the soldiers had to experience. This would take lot of inspiration from saving private Ryan and other WW2 related pieces of media in order to create a theatrical experience. On the other hand, if I were to make a game inspired from Hp Lovecraft it’d probably be based off the book Innsmouth. This book leaves the mystery open as it ends with the protagonist becoming one of the deep ones (a humanoid sea creature). This means that a new interactive story can be implemented into the world of Hp Lovecraft.
Werewolves of Millers Hollow


The Werewolves of Millers Hollow is a card game based around the idea of treachery and suspicion. There are two sides to this game (two separate objectives for the two different sides). There are the Werewolves, then there are the Villagers. The Villagers must successfully discover who of the townsfolk are actually werewolves and kill them. The werewolves must be able to hide from suspicion and kill all the townsfolk. There are other cards that can be include into the game to make it more interesting, diverse and more enjoyable. This game is a great example of what a telltale story game should do; that is keep the audience guessing and giving the audience the right information to successfully piece together/interpret the story in their own way.
The game starts with the games master handing out the different cards out to the different players. The players then look at the cards they were given and must not reveal the cards they were given to any other player. They then assume the roles of the cards they were assigned. The town then goes to sleep, this is when all the different cards take effect. For example the little girl is allowed to peak throughout the course of the night, during the turns of the wolves and the other cards. During the night the the Wolves choose one individual that will be killed off. After the different events of the night have taken place the town wakes up to find who has been killed. This cycle repeats throughout the course of the game and must eventually deduce who the wolves are and be-rid the town of them.
Production diary


The layout of the level was the easiest thing to create and design in comparison to the rest of the level. In order to create this level i had to create a tile map using piskel (all assets used were made by the group). I first designed the map on a piece of paper so I could edit the flow of the level and the overall design and item placements. This piece of paper mad it easier for me to create the layout of the level after placing in the tile maps, items and enemy sprites I created the pink collision boxes in order to keep both the player and the enemies with the designed map. We also had to be careful as a group to use the same window size in order to so the game fits the window and plays in the same place as the other levels.

I first started by giving the enemy its own hit box and their own behaviors in order to properly code it and so when the player fights back it actually gets hit. The Line Of Sight event was the most useful when creating the enemies (LOS). I had to get the enemy AI to chase the player when it enters the enemies line of view. Then the bullet function/event would propel the enemy demon sprite towards the playable character and chase him. I had to make it so the enemy would go at different speeds when he saw the character and couldn’t see the character. this was done by inverting an event that would regularly activate the LOS.
I then added the key and door function to make sure that the player couldn’t get past certain parts at certain points of the game. Instead of making the character carry the key via an inventory system I simply made it so that when the key collides with the player the Doors would be destroyed and the opened door sprites would move from the bottom layer the main layer.
I then added the global variable of health for the playable character. This would allow the enemies to actually deal damage to the character and eventually destroy it. In order for this to work though I needed to give the player their own hit box that the enemies could collide with and subtract health from the player.
I also had to give multiple sprites the “pin” behavior. This behavior would allow the different hit boxes and other various things to stick with the player or enemies. I had to make sure that this would happen both at the start of the layout and every tick. The every tick system would pin the objects at every moment of the game.
After doing that I gave the enemies their own health instance variables so that they could also be killed by the player. I had to make the event of when the enemies health is equal to 0 they would be destroyed. However I had to make sure that when the enemies destroyed they wouldnt be destroyed for good. So I added a re-spawn function in order to make sure that the player could never be free from danger. I did this by creating a little sprite called monsterspawn. I gave this sprite the event that when the demon boy is destroyed, spawn the monster hit box and spawn the actual sprite whilst pinning the different sprites together. In the players case I had to make it so when he was destroyed the layout would shift to the restart screen whilst also destroying all of the assets pinned to him.
After ensuring this worked i created a hide-able rock function. This would make it so when the rocks are overlapping the players sprite the monsters would turn 180 degrees and move in that direction. I had to make sure the monster also had LOS of the rocks in order for the enemy to recognise it.

I needed to create a food system in which the player can eat food and then heal for a single point of health. I accomplished this by first creating the flesh sprite (the food he consumes) on piskel. I then had to create a global variable called health, this variable would be for the health of the player. Every game requires a health system for the character and the enemies otherwise there’s no accomplishment nor consequence of not dealing with the problem/enemies. I placed the sprite in the layout and made it so the system would recognise and link it to the food and health global variable. I made it so when the player hit box (not the player sprite) collides with the flesh sprite the system would add 1 to the food global variable. I then made it so on the right mouse button clicked the system would add 1 to the health global variable but would subtract 1 from the food global variable (so the player could not infinitely heal).
I also had to make a way for the player to shoot and kill the enemies. I did this by creating a small box and gave it the turret and pin behaviour, so the box could actually shoot projectiles and actually stay with the player. After the projectile sprite was sent to me by my teammate Louis I made it into the projectile the turret box shoots. This was made possible by making the system create the projectile on the left mouse button being pressed. The projectile had to be given the bullet behaviour in order for the projectile to actually propel forward. The player turret box then had to face the mouse icon at every tick of the system in order for the player to more conveniently and easily aim. However the bullets could not exist forever so I made it so when the projectile sprite collides with the collision boxes of everything (other than the players) the sprite would be destroyed.

Then we had to make the animation link with the movement in order for it to look regular. This is where the 8 direction movement behaviour became very useful. It had to be made that when the player is facing a certain angle and/or moving at a different angle the player sprites animation would be set to the according animations, for example the walk up animation. The same was done for when the player is not moving and is facing different directions.
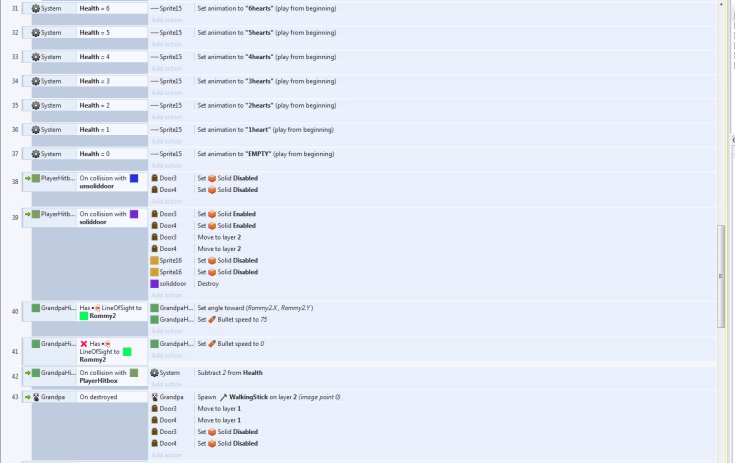
Furthermore, we had to create a health display so the player could actually see the amount of health they have. My teammate Louis created the health animation of 6 hearts. After the animated sprite was placed in the layout I had to move it to the top left of the layout in order for the hearts to follow the player on the screen. The health bar had to change/decrease/increase after the player was either hit by an enemy or gained health from the food. So, again, I had to make the global variable of health and the system co-operate with each other and set the animation to the different required animations after losing/gaining health.
Another enemy was then implemented; it was the grandpa sprite. I gave the grandpa sprite its own room on the layout. The grandpa would have to be defeated by the player in order for the player to obtain one of the 5 items to complete the level. In short the grandpa would be a mini-boss. I wanted it so when the player enters the room he/she would be trapped in there and would have to defeat the grandpa in order to get out and continue. I accomplished this by implementing 3 new boxes by the doors. The first box “unsolid door” would disable the doors solid function so the player could traverse through. The second box was placed after the doors. This box makes it so the actual door sprite will appear on the same layer and enable the solid function again, to keep the player from escaping. The box would have to destroy itself in order to prevent the door from becoming solid again after the grandpa was defeated. I then included the third box that would prevent the grandpa from preemptively leaving the room. without this box the player could use the grandpas LOS behaviour to lure the grandpa out of the room and make it easier to kill him. Anyway the third solid box would disable its solid behaviour after the player collides with the second box.
When the player is in the room the grandpa would use his LOS and bullet behaviour to then chase after the player. The grandpa had to be a bit harder to deal with than the regular enemies so I increased his life total to 50 and made it so he would instead take 2 lives off the player. In order to make this fair for the player however I made the grandpa slower than the regular enemies; already considering the player is in a confined space. After the player defeats the grandpa and the grandpa destroys himself and his hit boxes he would then spawn one of the 5 items, the walking stick. Moreover, the doors solid behaviour would also become disabled again.

I then created another global variable called the main item count. This variable would keep track of the items collected and ensure that the game progresses when the total equals 0. In order for this new global variables total to decrease however the player must collide with the different items. on collision the item would destroy themselves and subtract 1 from the global variable. After the total decreases to zero the layout would then shift to my teammates boss level/layout. However we could not figure out how to combine the 2 levels and ultimately ran out of time.
Problems I overcame:
-Problem 1: I first tried to make it so the enemy would bounce off the player sprite on collision to give the player time to run. However the monster would not bounce and instead glitch into the player and instantly destroy him. In order to overcome this I had to instead make it so the enemy doesn’t collide with the sprite and instead collide with the hit box, whilst also making the enemy, in general slower.
-Problem 2: Immediately after the first problem, before fixing it, I tried making it so when the monster collides with the player the monster would destroy itself and re-spawn. This did not work and again instantly destroyed the player. After doing the resolution above I fixed the instant destruction of the player, in order to fix the re spawn function I had to create a re spawn box for the monster to re spawn.
-Problem 3: At first the rock function did not work properly and instead the enemy could still see the player and would chase him.The enemy would also sometimes just teleport outside the map and go incredibly fast. I resolved this by making the enemy recognise the rock as an object and making it so the enemy faces 180 degrees away from the player and move in that direction.
I mainly used scirra forums for help using construct 2.
App Store logo analysis
![]()
Today we were tasked with analyzing a logo of our choice and finding out the reasoning behind why the designers made certain design choices.
Character research – unit 1


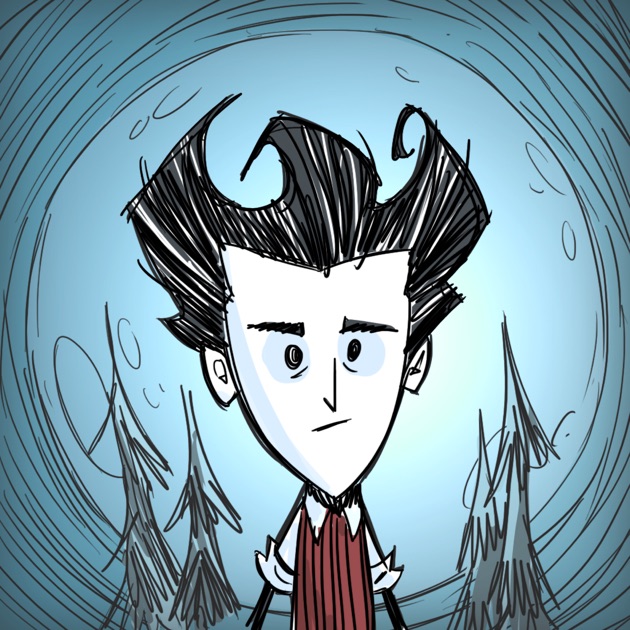
For our character research we researched into different games such as Don’t Starve and The Binding of Isaac. These two games greatly influenced the direction of our own character designs. Both Don’t Starve and The Binding of Isaac have something in common with their characters; both main Characters give little info and background information to the player. This is most likely done so the player can use their imagination more fluently to piece together the different pieces of info and background they’re given on the character. This technique piques the interest of the characters to the player thus making the player more interested in the games. Both main characters are also placed in a perilous situation in which the player feels obligated to aid the pitiful character out of that situation.
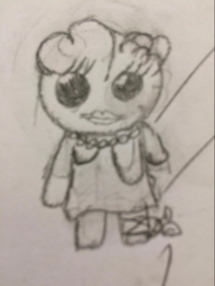
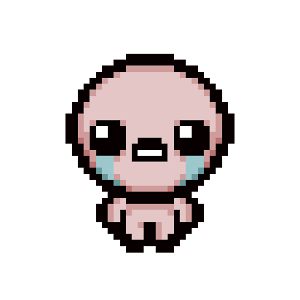

As shown from the images above the art styles are similar to that of don’t starve and the binding of Isaac. The freakette takes direct inspiration from the main protagonist Isaac whilst the boy takes inspiration from both Don’t starve and The binding of Isaac. When designing the freakette i had to make sure that she was similar to our games main protagonist in order for the player to trust her more. The boy on the other hand had to take on a more sinister look in order for the player to steer clear of the enemy.
![]()

After completing my drawings on the pieces of paper I handed it over to my teammate Louis for him to then draw it up on Piskel. I could not do this as I did not have access to a computer at home, at the time. The pictures above were the final pieces of my characters. We unfortunately couldn’t use the weight lifter and the regular boy version of the demon as a member of our group left half way through the project.
Play-testing of my Current Level


Recently I had someone play test my level in its current state. The feedback points out where I am going wrong when making this game. I am still yet to complete making this game, but all criticism is welcome as it will allow me to improve it. This way the criticism will allow me to make changes whilst its still in development stages rather than when the games completed.
Research Comparison
There are different types of research can be efficiently used to find useful and reliable pieces of information.
Qualitative research:
- interviews
- reviews
Quantitative research:
- Surveys
- Charts/tables
Types of research:
- Audience
- Market
- production
We have researched many different aspects of media and game industries to help us make important and safe choices for our game. This research varies from the most used platform to play games on to design choices in different games and the multiple art-styles used that we have taken a liking to. A big main part of our primary research is the research on the game The Binding of Isaac. We preformed this research by both playing the game and using secondary research, researching via websites, to depict what was successful and what best functions in the game. From our research we discovered that this game actually has a predecessor. This means that the first game was so successful that the team behind it was able to make another game. The first and second game were probably successful because of the unique cute yet gory art style and in-discriminatory difficulty. The questionnaires that we have created have aided us through the responses given.
Unit 3: Interactive portfolio (Femme Fatale)
")

This interactive portfolio crates a more depressing tone with the black background and grey shattered individual in the centre. The abyssal black used in the background connotes to negative things/emotions; it can be associated with depression and anxiety. The grey body/mannequin in the centre compliments the background greatly. The grey colour on the mannequin makes onlookers relate the image to that of a decaying corpse. The shattering of the mannequin represents how broken (emotionally) the creator is. This is probably done to appeal to a business that produces more dark/emotianally heavy froms of art. This portfolio is more art orientated than other gaming orientated portfolios.
The creator of this portfolio has stuck to a simplistic layout with a simplistic colour scheme to make sure that its easy on the eyes and not too chaotic to understand. The title can be interpreted in different ways. The part of the title that says ‘femme’ obviously represents the feminine nature or female individuals in general; this idea is further reinforced by the view of the woman in the background that has been fatally shattered. ‘Fatale’ is connoted death and devastation. Linking ‘femme’ and ‘fatale’ together creates the idea of females being fatal and destructive. It can also be interpreted as feminine individuals being dealt fatal blows emotionally or physically; there are a variety of different ways for this title to be interpreted.
Overall the interactive portfolio is neatly organised and has a very sleek design.
Unit 3: Robert Leonardi (interactive portfolio)
")
Robby leonardis interactive portfolio
http://www.rleonardi.com/interactive-resume/
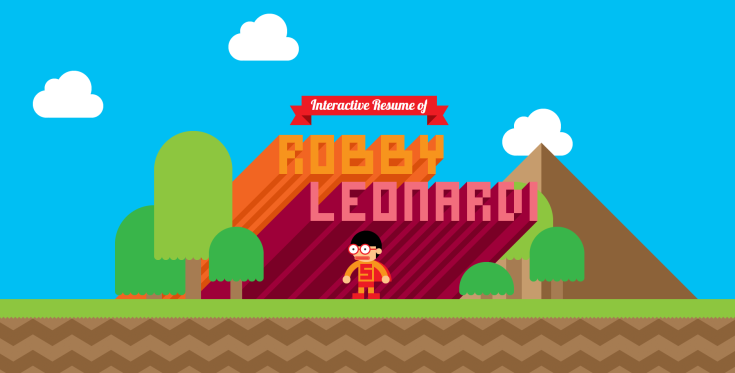
I beleive that the purpose of Robert Leonardis portfolio was to stand out in comparison to others applying for the same job. Most of the other applicants probably wouldnt have thought to be creative and make their portfolios interactive. The portfolio clearly shows off his skills and creativity an how he can dedicate time to achieving a goal. The target audience are obviously the middle-aged corporation owners that this portfolio is applied to. He purposely uses the retro art-style and mario like colour scheme to appeal to the older target audience. This is done deliberatley to evoke a sense of nostalgia of mario and other retro games like sonic and pac-man. The colours used connote to the retro games previously mentioned and time periods like the 80’s-90’s.

The typography varies in this interactive portfolio. The fancy font used at the top creates a professional tone whilst the text below it is more bold and simplistic.
